One of the most common issues we see when taking over websites is GA4 that’s installed, but not in the best way for long-term tracking. Too often, it’s connected directly to the site or routed through a plugin, which can add unnecessary complexity and make tracking harder to manage over time. We generally recommend connecting GA4 through Google Tag Manager instead, because it keeps code leaner on the site, makes future tracking changes easier, and creates a better foundation for adding platforms like Meta and LinkedIn. In this post, we’ll explain why setup method matters, what can go wrong, and what a cleaner GA4 setup looks like.
If you’re not interested in our rational feel free to skip straight down to the how! 😀
Table of contents
- Why the way you connect GA4 matters
- The three most common ways GA4 gets connected
- Why we recommend Google Tag Manager
- How to connect GA4 through Google Tag Manager
- Need help setting up GA4?
Why the way you connect GA4 matters
Connecting GA4 to your website is not just about getting the tracking code onto the page. The method you use affects how easy your analytics setup is to manage, update, and expand later.
A lot of websites technically have GA4 connected, but the setup creates more work than it should. We often see tracking added directly to the site, handled through a plugin, or split across multiple methods. That can make future updates harder, especially when you want to add event tracking, advertising pixels, or other platforms.
The better approach is usually the one that gives you a cleaner foundation long term.
Other common mistakes we always see:
- multiple tracking methods being used at once
- unclear event naming
- no consistent place to manage analytics and marketing tags
- difficulty adding future tracking without developer involvement
- Enhanced measurements not even turned on
If you already have a GA4 property use our PromptThis buttons to have your A.I evaluate your current GA4 implementations
If you want to learn more about PromptThis and potentially add it to your site check out our other blog.
The three most common ways we see GA4 being connected to websites
1. Directly in the site code
This means the Google tag is placed in the website itself, often in the theme, template, or platform settings.
This can work, but it is often not the most flexible option. Any tracking changes may require developer support or code changes later.
2. Through a plugin
Some websites use a plugin to connect GA4. This may seem convenient, but it adds another dependency to the setup. WordPress’s own documentation says plugins and themes should be kept updated for security, and Google’s web.dev documentation explains that third-party JavaScript can affect performance, privacy, security, and page behavior.
3. Through Google Tag Manager
This is the setup we usually recommend. Instead of placing separate tracking scripts directly on the site, Google Tag Manager gives you one place to manage GA4 and other marketing tags.
That creates a cleaner setup and makes future tracking changes much easier to manage.
Why we recommend Google Tag Manager
For most websites, Google Tag Manager (GTM) is the best way to connect GA4.
Here’s why:
- It keeps tracking in one place
- It reduces the need to add multiple scripts directly to the site
- It makes future tracking changes easier
- It supports platforms beyond Google, such as Meta and LinkedIn
- It gives your site a better long-term analytics foundation
This is especially important for growing websites. Even if your tracking needs are simple today, they often become more complex over time. A setup that works for basic pageviews may become limiting when you need to track form submissions, button clicks, campaign activity, or advertising conversions.
Learn everything about Google Tag Manager directly from Googles support site.
How to connect GA4 through Google Tag Manager
If you want a cleaner setup, the general process is straightforward.
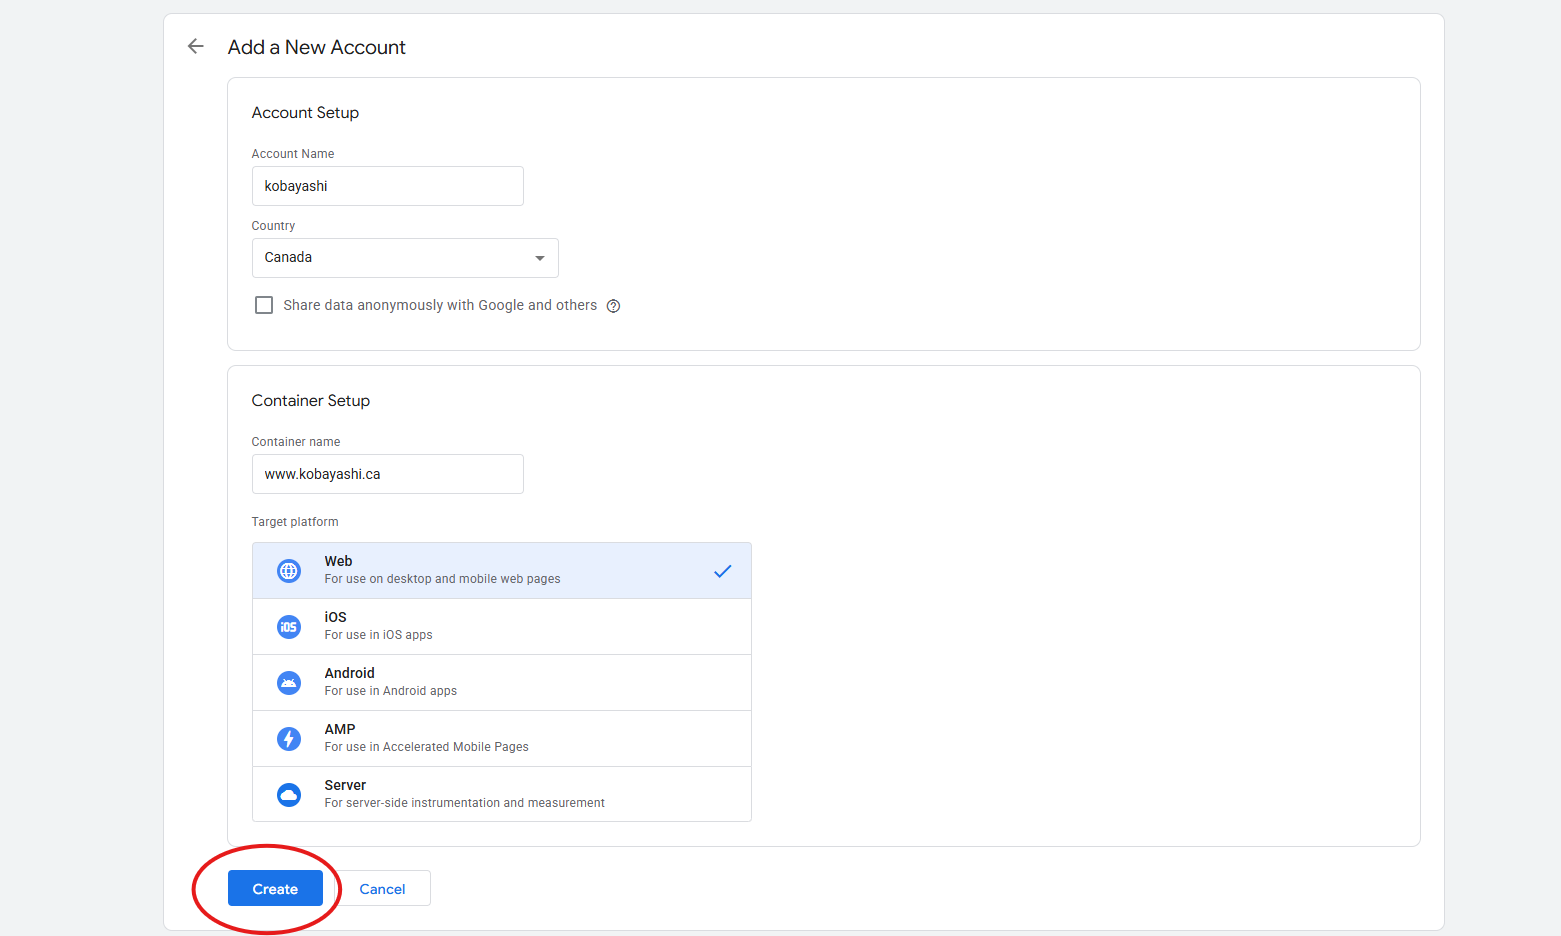
1. Create a Google Tag Manager container
If the website does not already have GTM installed, start by creating a container for the site.
- Go to the Google Tag Manager site.
- In the top right click Create Account.
- Then fill in everything with the relevant information and click create.

2. Install the GTM container on the website
Once the container is created, Google Tag Manager will give you two code snippets to add to the site.
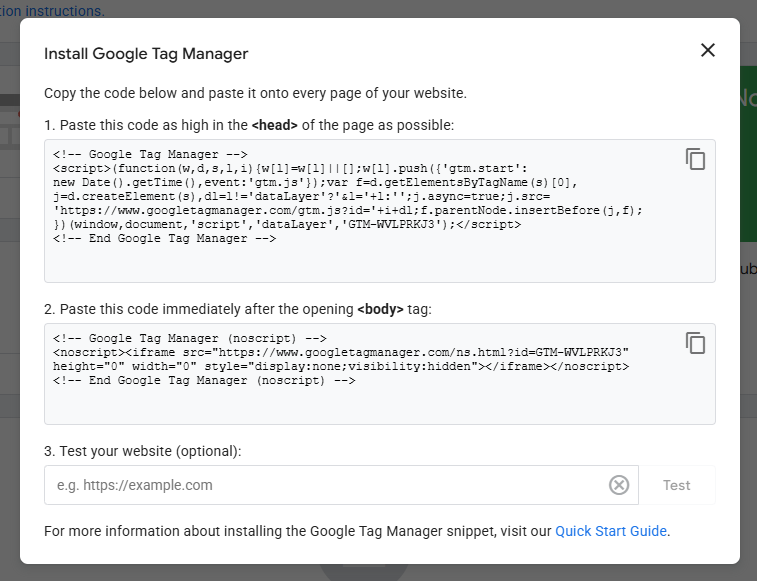
One goes in the <head> of the website, and the other goes immediately after the opening <body> tag.
Important: this part is different for every website. The exact method depends on the CMS, theme, builder, or framework the site uses. On some websites this is done in theme files, on others through platform settings, and on others through a tag injection area.
Because of that, we recommend only doing this step if you are confident editing the site safely.
Not sure how to add the GTM code to your site?
Every website handles code injection a little differently. If you are not sure where these snippets should go, or you want to avoid breaking anything, reach out to us and we can help you get it set up properly.
Need help installing GTM on your site?
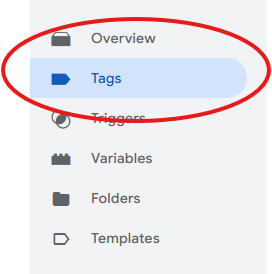
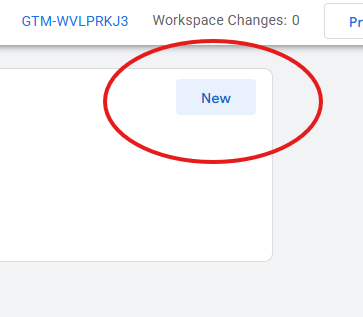
3. Add your GA4 tag inside GTM
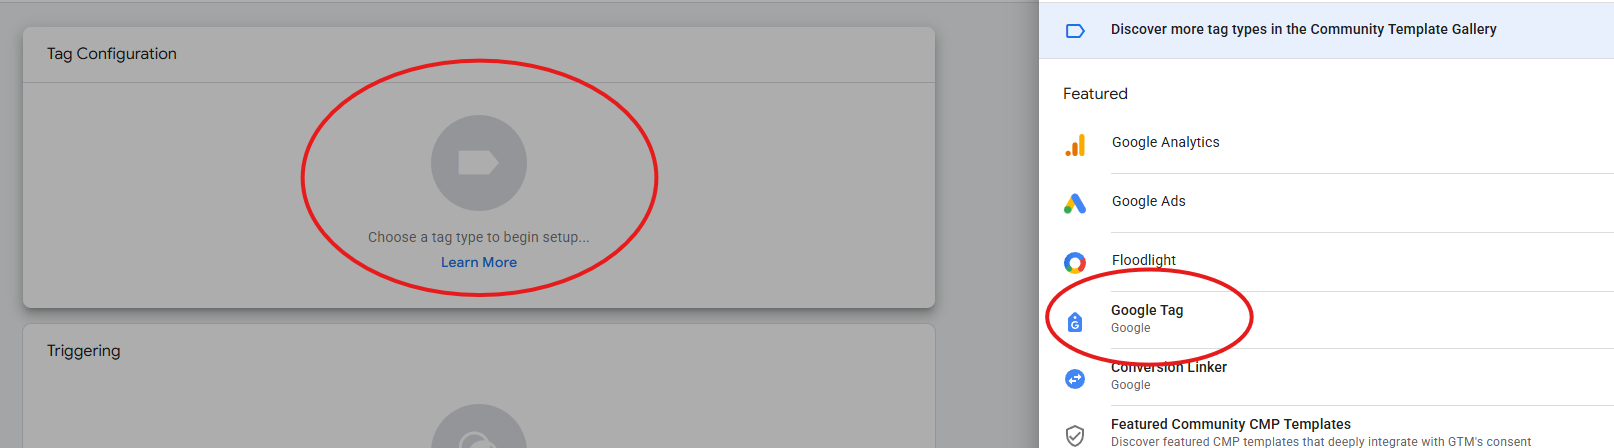
- Then go to the tags section on the right and click new in the top left.
- You can then click the center of the tag configuration panel and select Google Tag from the options the appear on the right.
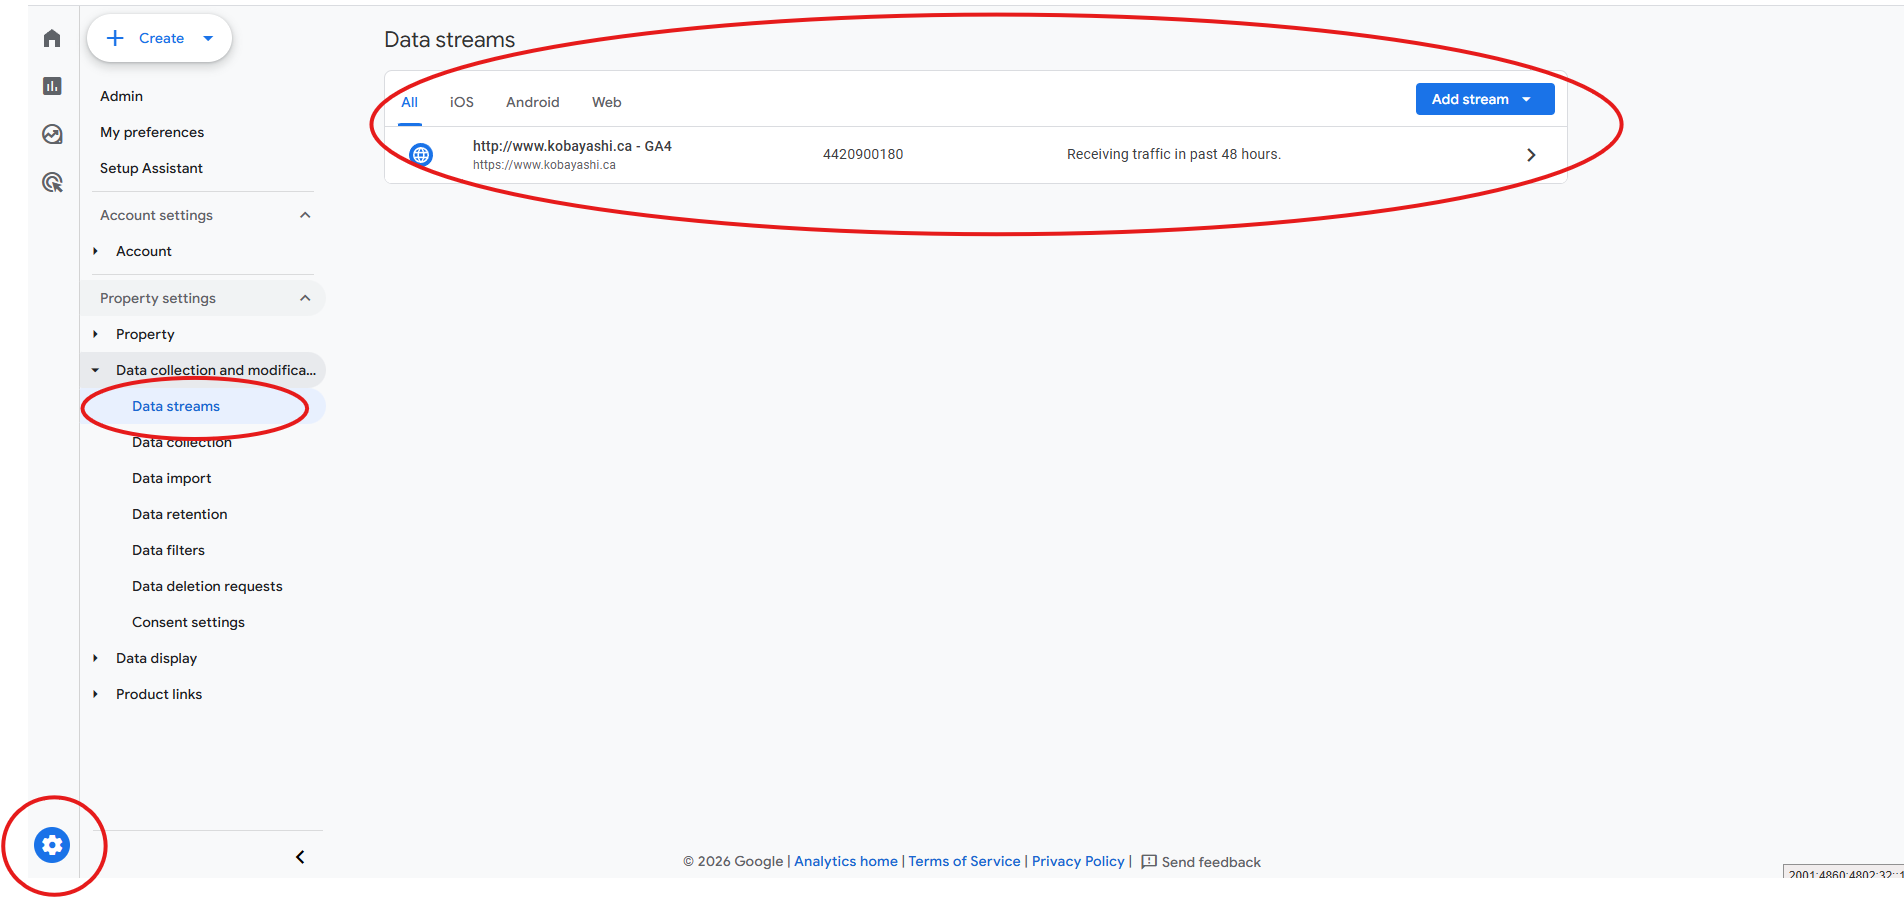
- Next you’ll have to go to your GA4 property and click on the gear icon in the bottom right then Data streams then either add a stream or select the one that’s there.
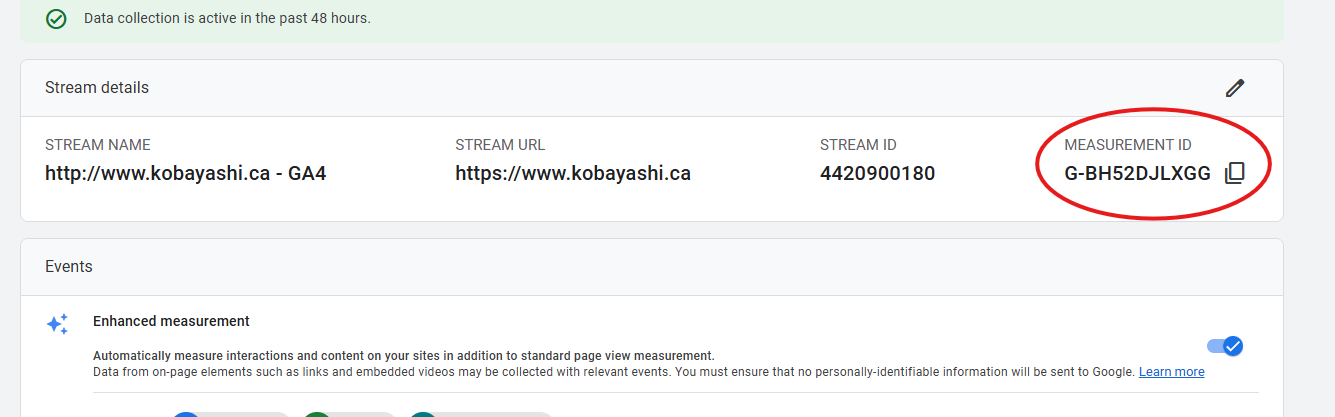
- Then you just need to copy the Measurement ID.
- Then paste the Measurement ID in the area labeled Tag ID, and make sure the triggering is set to Initialization – All Pages.
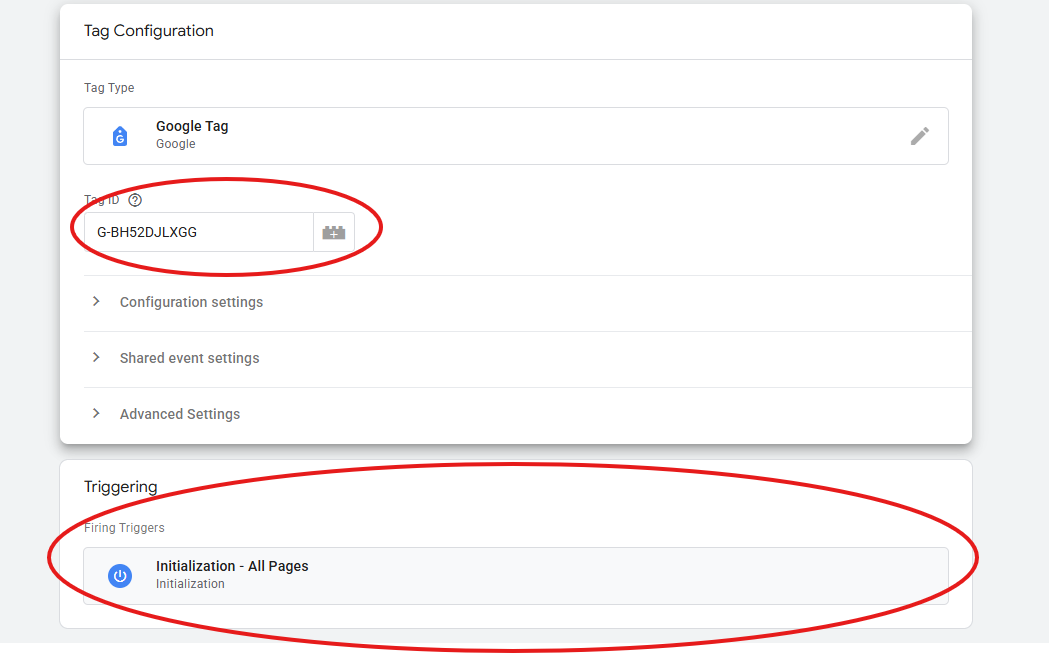
- After that save and in the top right it’s as simple as submitting and publishing.
Need help setting up GA4 the right way?
If you want a cleaner setup, we can help review your current implementation, recommend a better structure, and set up GA4 through Google Tag Manager in a way that is easier to manage over time.
For most websites, the best option is usually Google Tag Manager. It gives you one central place to manage GA4 and other tracking tools, which makes future changes easier and keeps your site cleaner.
Not always. A direct install can work, especially on simpler websites, but it is often less flexible over time. If you later want to add event tracking, advertising pixels, or other platforms, direct installation can become harder to manage.
A few common possibilities are:
- directly in the site code
- through a plugin
- through Google Tag Manager
- through multiple methods at once
If you are unsure, it is worth checking before making changes. Running GA4 through more than one method can create duplicate tracking and messy data.